Image
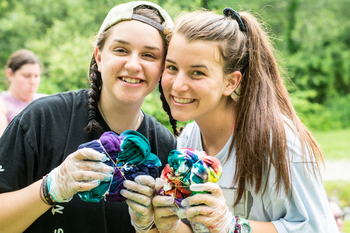
Nothing says summer quite like the neon colors and vibrant swirls of tie-dyed clothing! Make like you're at summer camp by creating your own tie-dyed masterpieces using these easy instructions from URJ Crane Lake Camp, a Reform Jewish summer camp in West Stockbridge, MA.
You'll need:
- white shirt
- gloves
- drip tray
- fixer (one cup of soda ash per gallon of warm water)
- rubber bands
- dye color (1 quart of water per 8 teaspoons of dye and 1/4 cup of urea) in squeeze bottles
- plastic bag
Tie-dye in 10 easy steps:
- Spread your shirt out and pinch it wherever you’d like the center to be. Then, twist the shirt as if you’re making a cinnamon roll.
- Use rubber bands to wrap the shirt so it looks like a pizza pie.
- Soak your shirt in fixer (soda ash and water) for 15 minutes or more. This help the shirt soak up the dye.
- Squeeze out excess fixer and place the shirt on top of a drip tray.
- Put on your gloves! On each piece of the pizza pie separated shirt, squirt a different color of dye (a mixture of dye, water, and urea). Flip the shirt over and dye an identical design as the other side.
- Put the shirt in a plastic bag. This slows down the drying process.
- Let the shirt sit for six hours.
- Untie the shirt and squeeze out excess liquid. Rinse.
- Put the shirt in a washing machine and wash with tie-dye detergent (Dharma professional textile detergent can be used as a pre-wash and an after wash). Dry normally.
- Rock your shirt!
Nino Hernandez, originally from the Philippines, is the arts and crafts director at URJ Crane Lake Camp. He is a painter, musician, teacher, and athlete.